1. Dependencies
Create a new Spring Boot project and add the statemachine in dependencies.
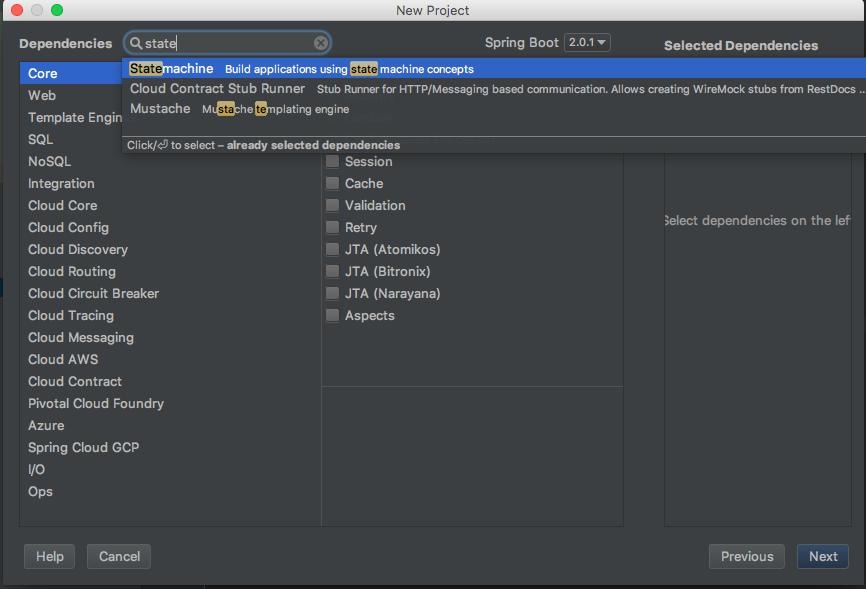
The one starter made all the magic
<dependency>
	<groupId>org.springframework.statemachine</groupId>
	<artifactId>spring-statemachine-starter</artifactId>
</dependency>
2. States & Events
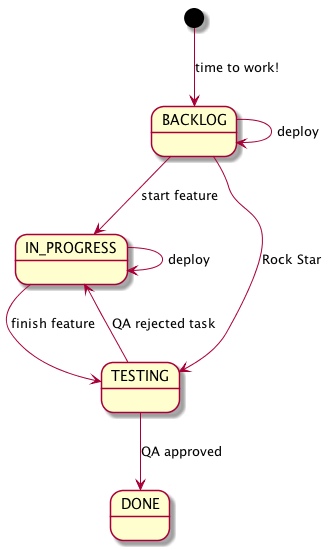
For example, consider the business process that is known to most developers - a software development lifecycle and Kanban methodology. If you didn’t hear about the Kanban before, then you should read about this methodology. You can find a many articles about it on the Internet.
Let’s see the following scheme:
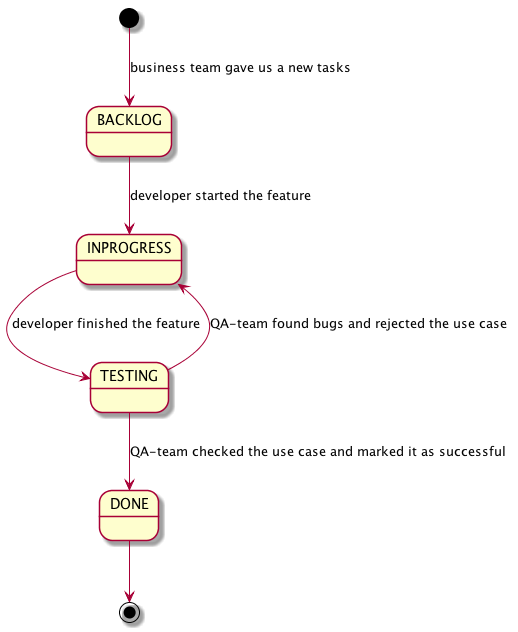
We can extract the following states from this business-process: BACKLOG,
IN_PROGRESS, TESTING, DONE. This will be our set of states.
The transition from one state to another passes by a certain event.
Also we need extracting set of events from the scheme:
START_FEATURE, FINISH_FEATURE, QA_REJECTED_UC, ROCK_STAR_DOUBLE_TASK, DEPLOY, QA_CHECKED_UC.
The spring state machine provides the ability to configure itself through enums. You can describe states and events in enumeration:
public enum States {
    BACKLOG,
    IN_PROGRESS,
    TESTING,
    DONE
}

public enum  Events {
    START_FEATURE,
    FINISH_FEATURE,
    QA_REJECTED_UC,
    ROCK_STAR_DOUBLE_TASK,
    DEPLOY,
    QA_CHECKED_UC
}
3. Configuration
We will consider an example of using a state machine through the use of standard spring DI. We need to make a spring configuration for the state machine:
@Configuration
@EnableStateMachine
public class StateMachineConfig
        extends EnumStateMachineConfigurerAdapter (1)
                        <States, Events> {

    @Override
    public void configure(
            StateMachineConfigurationConfigurer
                    <States, Events> config) throws Exception {

        config.withConfiguration()  (2)
              .autoStartup(true);
    }


    @Override
    public void configure(
            StateMachineStateConfigurer<States, Events> states)
            throws Exception {

        states.withStates()		(3)
              .initial(States.BACKLOG)
              .state(States.IN_PROGRESS)
              .state(States.TESTING)
              .end(States.DONE);
    }

    @Override
    public void configure(
            StateMachineTransitionConfigurer<States, Events> transitions)
            throws Exception {

        transitions.withExternal()  (4)
                   .source(States.BACKLOG)
                   .target(States.IN_PROGRESS)
                   .event(Events.START_FEATURE)
                   .and()
                   .withExternal()
                   .source(States.IN_PROGRESS)
                   .target(States.TESTING)
                   .event(Events.FINISH_FEATURE)
                   .and()
                   .withExternal()
                   .source(States.TESTING)
                   .target(States.IN_PROGRESS)
                   .event(Events.QA_TEAM_REJECT)
                   .and()
                   .withExternal()
                   .source(States.TESTING)
                   .target(States.DONE)
                   .event(Events.QA_TEAM_APPROVE);
}| 1 | we working with a type-safe, all of our states and events are described by the enums, so these types will be declared in the configuration. |
| 2 | override a base method for configuring the state machine. |
| 3 | description of states |
| 4 | description of transitions |
You need to specify the entry point to the state machine (the initial state) in the settings of states. When the state machine is start, the transition to this point will be the first.
We set the autostart setting in the base configuration, then the state machine will start immediately in the initialization state.
It is important to understand that the transition to the BACKLOG state from "nowhere" is also a transition,
a little later, we will see it more clearly.
Also, we specify the exit point (end state) in the configuration of states. Transition to this state will stop the state machine.
The configuration of the transitional looks pretty intuitive, for each transition you need to specify the source state, the target state, and the event that will triggered this transition.
4. Try to use it
Test successful DI & initialization of the state machine
@RunWith(SpringRunner.class)
@SpringBootTest
public class StatesFirstApplicationTests {

    @Autowired
    private StateMachine<States, Events> stateMachine;

    @Test
    public void initTest() {
        Assertions.assertThat(stateMachine.getState().getId())
                  .isEqualTo(States.BACKLOG);

        Assertions.assertThat(stateMachine).isNotNull();
    }
}
Let’s try to test a main flow of the application, when execution is on a positive way ("green way"):
@Test
public void testGreenFlow() {
    // Arrange
    // Act
    stateMachine.sendEvent(Events.START_FEATURE);
    stateMachine.sendEvent(Events.FINISH_FEATURE);
    stateMachine.sendEvent(Events.QA_TEAM_APPROVE);
    // Asserts
    Assertions.assertThat(stateMachine.getState().getId())
              .isEqualTo(States.DONE); (1)
}| 1 | the main criterion for the successful completion of this test is the achievement of the "DONE" state. In a real test, it would be worthwhile to check each transition, not only the final state after a series of transitions, but for our research purposes this will be enough. |
5. Intercept the events of the state machine
Add a state machine listener in the configuration:
@Override
public void configure(
				StateMachineConfigurationConfigurer
								<States, Events> config) throws Exception {

		config.withConfiguration()
					.listener(listener()) (1)
					.autoStartup(true);
}

private StateMachineListener<States, Events> listener() {
		return new StateMachineListenerAdapter<States, Events>(){
				@Override
				public void transition(Transition<States, Events> transition) { (2)
						log.warn("move from:{} to:{}",
										 ofNullableState(transition.getSource()),
										 ofNullableState(transition.getTarget()));
				}

				@Override
				public void eventNotAccepted(Message<Events> event) { (3)
						log.error("event not accepted: {}", event);
				}

				private Object ofNullableState(State s) {
						return Optional.ofNullable(s)
													 .map(State::getId)
													 .orElse(null);
				}
		};
}| 1 | declaration of the listener |
| 2 | override a callback for intercept any transitions |
| 3 | override a callback for attempt of unacceptable transitions |
After that we can make a "wrong way" test:
@Test
public void testWrongWay() {
// Arrange
// Act
stateMachine.sendEvent(Events.START_FEATURE);
stateMachine.sendEvent(Events.QA_TEAM_APPROVE);
// Asserts
Assertions.assertThat(stateMachine.getState().getId())
.isEqualTo(States.IN_PROGRESS);
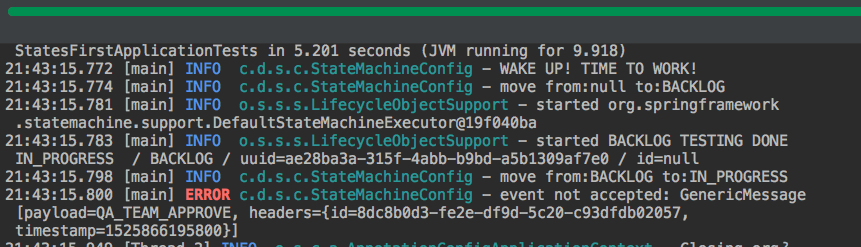
}then look at the error in the logs:
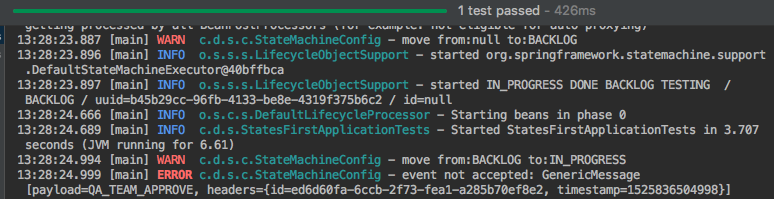
This is a clear example of what I said before:
the starting transition from "nowhere" to BACKLOG is also a transition.
We should use the method ofNullableState
because the source state in this transition is null.
6. More than one state machine? No problem!
Change annotation @EnableStateMachine to @EnableStateMachineFactory,
this provide us the ability to create a state machines from factory
and we can inject the factory instead of a concrete instance.
@Slf4j
@Configuration
@EnableStateMachineFactory
public class StateMachineConfig
        extends EnumStateMachineConfigurerAdapter
                        <States, Events> {

								...

}
and now we need to change the tests:
@RunWith(SpringRunner.class)
@SpringBootTest
public class StatesFirstApplicationTests {

    private StateMachine<States, Events> stateMachine;

    @Autowired
    private StateMachineFactory<States, Events> stateMachineFactory;

    @Before
    public void setUp() throws Exception {
        stateMachine = stateMachineFactory.getStateMachine(); (1)
    }

		...
}| 1 | obtain an instance of the state machine from the factory |
7. Actions - add some business logic
Let’s run the auto-deploy action after a feature finished.
We can do this as follows:
@Override
public void configure(StateMachineStateConfigurer<States, Events> states)
				throws Exception {

		states.withStates()
              .initial(States.BACKLOG)
              .state(States.IN_PROGRESS)
              .state(States.TESTING, deployAction()) (1)
              .end(States.DONE);
}

private Action<States, Events> deployAction() {  (2)
		return context -> {
				log.warn("DEPLOYING: {}",context.getEvent());
		};
}| 1 | add the deploy action in the configuration of the states, after entering in the TESTING state |
| 2 | implementation of the deploy action |
This approach has a one problem.
If we slightly complicate our business process, then this action can be performed when it is unnecessary.
For example, if a developer finished two features in the one pull-request,
then he can transfer the second task to the TESTING state without run additional deployment.
We hope that he did it because he is a super efficient, so we can call him a "Rock Star".
Add the "rock star" transition in the configuration:
transitions.withExternal()
           		...
           .and()
           .withExternal()
           .source(States.BACKLOG)
           .target(States.TESTING)
           .event(Events.ROCK_STAR_MAKE_ALL_IN_ONE);
Now if we move a task from backlog to testing then will be run deploy. But we don’t want this behavior.
Check this proposition in the test:
@Test
public void testRockStar() {
    // Arrange
    // Act
    stateMachine.sendEvent(Events.ROCK_STAR_MAKE_ALL_IN_ONE);
    // Asserts
    Assertions.assertThat(stateMachine.getState().getId())
              .isEqualTo(States.TESTING);
}
test results:

We can see that the deployAction is triggered by any transition to the state TESTING.
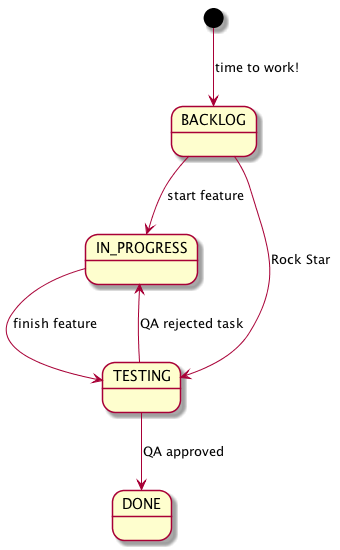
How can we solve this problem? We can move the action from the configuration of states to the configuration of transitions:
states.withStates()
      .initial(States.BACKLOG, timeToWorkAction())
      .state(States.IN_PROGRESS) (1)
      .state(States.TESTING)
      .end(States.DONE);

  ...

transitions.withExternal()
           	...
           .source(States.IN_PROGRESS)
           .target(States.TESTING)
           .event(Events.FINISH_FEATURE)
           .action(deployAction())  (2)
           .and()
...| 1 | remove the deploying action from the configuration of states |
| 2 | past the action on the transition from IN_PROGRESS to FINISH_FEATURE |
It provides us a more flexibility and allows to run actions by making a certain transitions.
8. Guards - use conditions in flow.
Next we will add the ability to run deploying from BACKLOG and IN_PROGRESS states.
We will make DEPLOY as a separate event so that developers can decide when to do it themselves.
But before going to TESTING, we will verify that the deployment event was called.
For this we will create a guard on transitions to TESTING state.
Add transitions for internal DEPLOY and guards for transitions to the TESTING state.
transitions.withExternal()
           .source(States.BACKLOG)
           .target(States.IN_PROGRESS)
           .event(Events.START_FEATURE)
           .and()
           .withExternal()
           .source(States.IN_PROGRESS)
           .target(States.TESTING)
           .event(Events.FINISH_FEATURE)
           .guard(checkDeployGuard()) (1)
           .and()
           .withExternal()
           .source(States.TESTING)
           .target(States.IN_PROGRESS)
           .event(Events.QA_TEAM_REJECT)
           .and()
           .withExternal()
           .source(States.TESTING)
           .target(States.DONE)
           .event(Events.QA_TEAM_APPROVE)
           .and()
           .withExternal()
           .source(States.BACKLOG)
           .target(States.TESTING)
           .guard(checkDeployGuard()) (1)
           .event(Events.ROCK_STAR_MAKE_ALL_IN_ONE)
           .and()

           .withInternal()
           .source(States.BACKLOG)
           .event(Events.DEPLOY) (2)
           .action(deployAction())
           .and()
           .withInternal()
           .source(States.IN_PROGRESS)
           .event(Events.DEPLOY) (2)
.action(deployAction());| 1 | guards on transitions to the TESTING state |
| 2 | internal DEPLOY events |
Then we make a guard implementation based on the state machine variables. You can write in the extend state a lot of useful things that will be shared in a process.
private Guard<States, Events> checkDeployGuard() {
    return context -> {
        Boolean flag = (Boolean) context.getExtendedState()
                                        .getVariables()
                                        .get("deployed");
        return flag == null ? false : flag;
    };
}
After that, we can use this variable in the deployment action:
private Action<States, Events> deployAction() {
    return context -> {
        log.warn("DEPLOYING: {}", context.getEvent());
        context.getExtendedState()
               .getVariables()
               .put("deployed", true);
    };
}
Now we can make a unit test for this case
@Test
public void testGuard() {
    // Arrange & act
    stateMachine.sendEvent(Events.START_FEATURE);
    stateMachine.sendEvent(Events.FINISH_FEATURE);
    stateMachine.sendEvent(Events.QA_TEAM_APPROVE); // not accepted!
    // Asserts
    Assertions.assertThat(stateMachine.getState().getId())
              .isEqualTo(States.IN_PROGRESS);
}
If we don’t send the DEPLOY event then we get the following result:
9. Persisting State machine
In this section, we will look at how to save and load a current state of the state machine in different storages.
The process of creating a state machine immediately in a certain state is not easy, so that not to keep all the created state machines in memory all the time, we need a tool to save and load a state of the state machine by identifier.
9.1. Persisting state machine in-memory
To start we make a simple (in-memory) implementation of the storage system.
| We used this kind of storage just for a demonstration. For a real application you need to prefer a more stable and complexity storage system. |
We need to write an implementation of StateMachinePersist:
public class InMemoryPersist
        implements StateMachinePersist<States, Events, UUID> {

    private HashMap<UUID, StateMachineContext<States, Events>> storage
            = new HashMap<>(); (1)

    @Override
    public void write(StateMachineContext<States, Events> context,
                      UUID contextObj) throws Exception {

        storage.put(contextObj, context);
    }

    @Override
    public StateMachineContext<States, Events> read(UUID contextObj) throws Exception {
        return storage.get(contextObj);
    }
}| 1 | We using the HashMap to save a state machines |
We need to store the context of the state machine,
not the instance of the state machine.
The StateMachineContext contains not only the current state,
there are also stored variables that we write to the context.
It provide ability to restore a completely identical state of the state machine.
|
Than we make a persist configuration:
@Bean
public StateMachinePersist<States, Events, UUID> inMemoryPersist() {
    return new InMemoryPersist();
}

@Bean
public StateMachinePersister<States, Events, UUID> persister(
        StateMachinePersist<States, Events, UUID> defaultPersist) {

    return new DefaultStateMachinePersister<>(defaultPersist);
}
Now we can use it:
@Autowired
private StateMachineFactory<States, Events> stateMachineFactory;

@Autowired
private StateMachinePersister<States, Events, UUID> persister;

@Test
public void testPersist() throws Exception {
	 // Arrange
	 StateMachine<States, Events> firstStateMachine =
					 stateMachineFactory.getStateMachine();

	 StateMachine<States, Events> secondStateMachine =
					 stateMachineFactory.getStateMachine();

	 firstStateMachine.sendEvent(Events.START_FEATURE);
	 firstStateMachine.sendEvent(Events.DEPLOY);

	 // Precondition
	 Assertions.assertThat(secondStateMachine.getState().getId())
						 .isEqualTo(States.BACKLOG);

	 // Act
	 persister.persist(firstStateMachine, firstStateMachine.getUuid()); (1)
	 persister.restore(secondStateMachine, firstStateMachine.getUuid()); (2)

	 // Asserts
	 Assertions.assertThat(secondStateMachine.getState().getId())
						 .isEqualTo(States.IN_PROGRESS);
}| 1 | Save the context of the first state machine. |
| 2 | Loading the context of the first state machine to the second state machine instance. |
9.2. Persisting state machine in MongoDb
Let’s consider an example of a real storage system for the state machines.
We need to add a some dependencies for working with the MongoDb. Also we will write integration tests with TestContainers framework.
<!-- MongoDB -->
<dependency>
	<groupId>org.springframework.boot</groupId>
	<artifactId>spring-boot-starter-data-mongodb</artifactId>
</dependency>
<dependency>
	<groupId>org.springframework.statemachine</groupId>
	<artifactId>spring-statemachine-data-mongodb</artifactId>
	<version>2.0.0.RELEASE</version>
</dependency>
<!-- MongoDB -->

<!-- TestContainers -->
<dependency>
	<groupId>org.testcontainers</groupId>
	<artifactId>testcontainers</artifactId>
	<version>1.4.3</version>
</dependency>
<!-- TestContainers -->
Then we make a MongoDb persist
@Bean
public StateMachineRuntimePersister<States, Events, UUID> mongoPersist(
        MongoDbStateMachineRepository mongoRepository) {

    return new MongoDbPersistingStateMachineInterceptor<States,Events,UUID>(mongoRepository);
}
Now we can make the integration test.
I have the abstract class for a testing mongodb applications in spring framework projects. The TestContainers library allows us to run the mongodb in the docker container and use it as a target database:
@SpringBootTest
@RunWith(SpringRunner.class)
public abstract class BaseMongoIT {

    private static final Integer MONGO_PORT = 27017;
    private static GenericContainer mongo =
            new GenericContainer("mongo:latest")
            .withExposedPorts(MONGO_PORT);

    static {
        mongo.start();
        System.setProperty("spring.data.mongodb.host", mongo.getContainerIpAddress());
        System.setProperty("spring.data.mongodb.port", mongo.getMappedPort(MONGO_PORT).toString());
    }

    @Autowired
    protected MongoTemplate mongoTemplate;
}
and test case:
public class MongoPersistTest extends BaseMongoIT {

    @Autowired
    private StateMachinePersister<States, Events, UUID> persister;
    @Autowired
    private StateMachineFactory<States, Events> stateMachineFactory;

	@Test
    public void testMongoPersist() throws Exception {
        // Arrange
        StateMachine<States, Events> firstStateMachine = stateMachineFactory.getStateMachine();
        StateMachine<States, Events> secondStateMachine = stateMachineFactory.getStateMachine();

        firstStateMachine.sendEvent(Events.START_FEATURE);
        firstStateMachine.sendEvent(Events.DEPLOY);

        // Act
        persister.persist(firstStateMachine, firstStateMachine.getUuid());
        persister.persist(secondStateMachine, secondStateMachine.getUuid());
        persister.restore(secondStateMachine, firstStateMachine.getUuid());

        // Asserts
        Assertions.assertThat(secondStateMachine.getState().getId())
                  .isEqualTo(States.IN_PROGRESS);

        boolean deployed = (boolean) secondStateMachine.getExtendedState()
                                                       .getVariables()
                                                       .get("deployed");

        Assertions.assertThat(deployed).isEqualTo(true);

        // Mongo specific asserts:
        Assertions.assertThat(mongoTemplate.getCollectionNames())
                  .isNotEmpty();

        List<Document> documents = mongoTemplate.findAll(Document.class,
                                                         "MongoDbRepositoryStateMachine");

        Assertions.assertThat(documents).hasSize(2);
        Assertions.assertThat(documents)
                  .flatExtracting(Document::values)
                  .contains(firstStateMachine.getUuid().toString(),
                            secondStateMachine.getUuid().toString())
                  .contains(firstStateMachine.getState().getId().toString(),
                            secondStateMachine.getState().getId().toString());
    }
}
In the specific asserts, we checked that the save was exactly in the MongoDB.
10. A Multiple configuration of state machines in one project
We sometimes need to use a several different state machines in a single project. These state machines can have their own sets of states and events.
In order to make a several state machines, you need to use a name on the declaration of the state machine factory.
@Configuration
@EnableStateMachineFactory(name = "secondStateMachineFactory")
public class SecondStateMachineConfig extends EnumStateMachineConfigurerAdapter<States, Events> {
		...
}
Now you can inject the state machine by using this name in the qualifier above the factory:
@Autowired
@Qualifier("secondStateMachineFactory")
private StateMachineFactory<States, Events> secondStateMachineFactory;
So, you can use a several state machines at the same time.
11. Life seems boring without state machines
Let’s look at the several alternative solutions without using the state machines. And consider their pros and cons.
11.1. First Alternative is - You can hardcode your business logic
It looks like a spaghetti code:
    class StateMachine {

        private States currentState;
        private HashMap<String, Object> variables;
        private boolean finished;

        public void processing(Events event) {

            if(!finished) {
                log.error("already finished state machine");
            }

            switch (currentState) {
                case BACKLOG:
                    if (event == Events.START_FEATURE) {
                        currentState = States.IN_PROGRESS;
                        // transition logic
                    } else if (event == Events.DEPLOY) {
                        variables.put("deployed", true);
                        // start deploy
                    } else {
                        log.error("not accepted event.");
                    }
                    break;

                case IN_PROGRESS:
                    if (event == Events.FINISH_FEATURE) {
                        if (variables.get("deployed").equals(true)) {
                            currentState = States.TESTING;
                            // run business logic
                        } else {
                            log.error("unreachable state");
                        }
                        // transition logic
                    } else if (event == Events.DEPLOY) {
                        variables.put("deployed", true);
                        // start deploy
                    } else {
                        log.error("not accepted event.");
                    }
                    break;

                case TESTING:
                    if(event == Events.QA_TEAM_APPROVE){
                        currentState = States.DONE;
                        finished = true;
                        log.info("successful done!");
                    } else if (event == Events.QA_TEAM_REJECT){
                        currentState = States.IN_PROGRESS;
                        log.info("reject");
                    } else {
                        log.error("not accepted event.");
                    }
                    break;

						...

            }
        }
Of course, you can work on the organization of this code, you can replace the repeating logic and make a strategy for processing events, etc. But in the first approximation it is very difficult to maintain this code. It is difficult to track the logic of the transitions and their availability.
Pros:
-
Speed of implementation, you don’t need to create an infrastructure for working with a business processes
Cons:
-
Very poor code maintenance in the future.
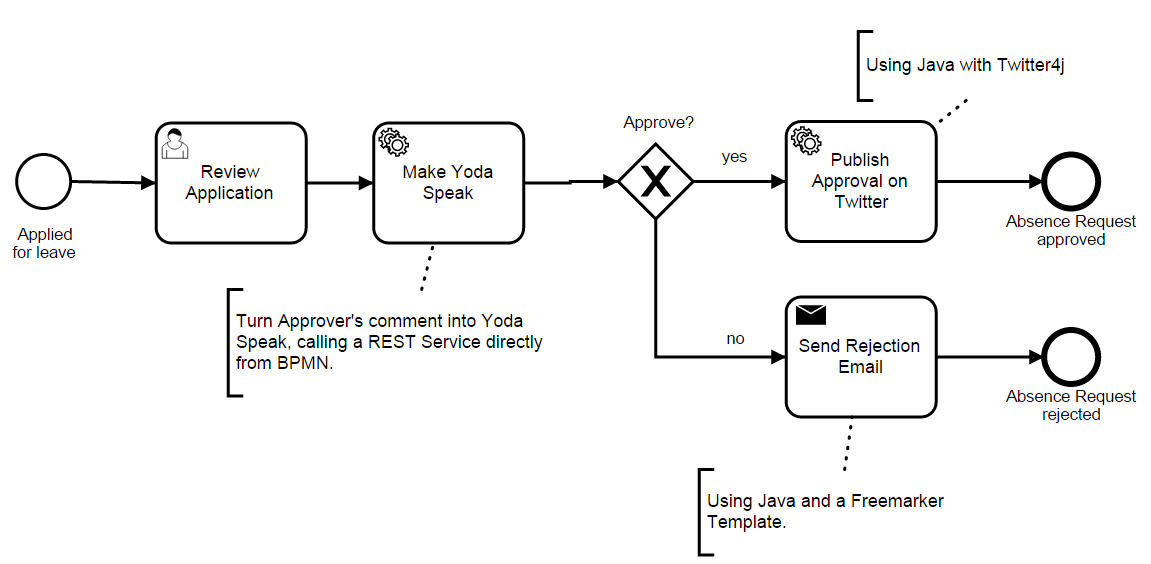
11.2. The second alternative is - You can use any BPM engine
This is a good alternative, but a quite expensive. I will shortly discuss the cost of using the BPM in a project. First, you will need to deploy a full-fledged framework for a BPM processes in the project. These frameworks are not lightweight, not all of them work natively in the java. Secondly, you need to know the BPMN notation and be able to describing your business process by using this notation.
You should use BPMN-engine:
-
If you have very complex business processes.
-
When you need a lot of opportunities that provided by the BPM notation, such as: messages, subprocesses, signals, conditions on any transitions, etc.
-
If you need a process versioning.
-
When you need to visualize a processes by their code.
-
When you need a tools to view and debug of all current processes and their states.
You should not use BPMN-engine:
-
If you have a very simple processes and a set of system states is obvious.
-
If you have a little time to develop and(or) you don’t have a specialists in this subject area.
-
If you do not need to manage a versioning of the processes.
-
There is no way to deploy a full-fledged BPM framework in production. (you do not have a required resources, or a infrastructure for this, or a specialists for support)