1. Services integration problem
In this article, we will consider an example of microservice application.
This application consists of task-service and report-service.
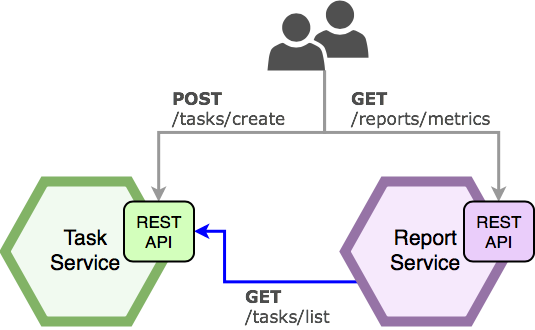
In the task-service, we can create and get tasks.
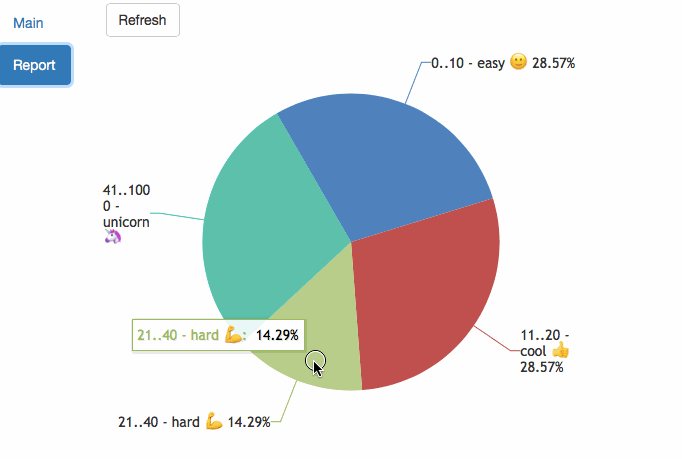
The report-service provides us the statistics of tasks distribution.
For creating these statistics, the report-service is using the API has provided by the task-service.
So, we have two services that communicate together. The "contract" is the API which is using between a pair of microservices. In this article, we will consider a tool to maintain the consistency of the contract between microservices.
In terms of the Consumer Driven Contracts,
the task-service is a provider of the API, and report-service is a consumer.
If we change a contract on the producer side, our consumer will not be able to get data from the producer:
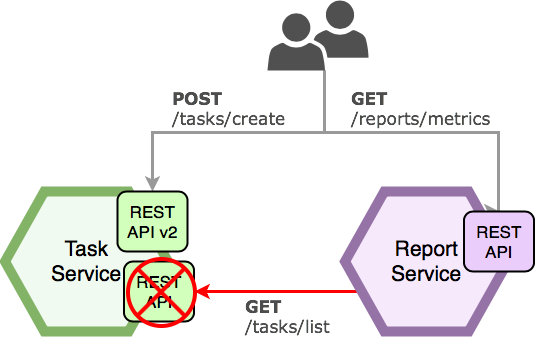
We need to know that one of the services does not match the contract. And we need to know about this as soon as possible. In this article, we will consider how to prevent this situation by using cloud contracts. In order to do it, we will write contract tests and will consider how to deliver a contract to each of the services.
2. Workflow of using a cloud contract:
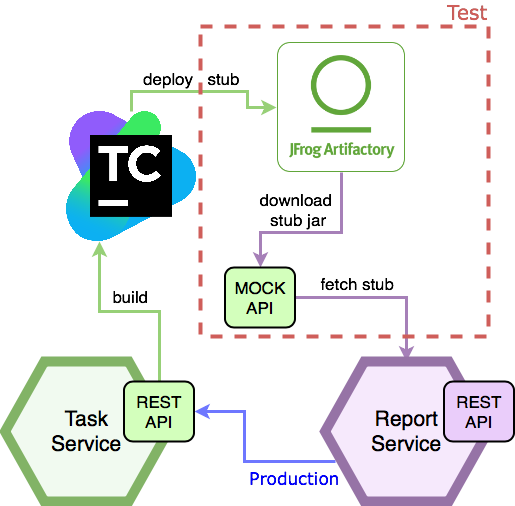
-
we write groovy contract files on the producer side (in the
task-service) -
build
task-service, generate and run contract tests (for JUnit5) -
install JAR file with the stub of contracts (json request/response schemes of the
task-service) -
deploy this stub to the binary repository (Artifactory)
-
write contract tests on the consumer side (in the
report-service) -
use the stub from the Artifactory in tests of the consumer
3. Provider configuration
Support for JUnit5 is currently unavailable in the stable release of Spring Cloud Contract(2.0.1). But this feature already completed in the master branch and we can use it from the snapshots.
I think it’s possible to use an unstable version for work with JUnit5, because we will use this just in tests, and the spring cloud contract is a project with a good ecosystem and support. In my opinion, an ability to use JUnit5 in tests provides us a lot of benefits and we can close our eyes to work with the version from snapshots.
We need to add the next repository of snapshots:
3.1. Dependencies
<repositories>
    <repository>
        <id>spring-snapshots</id>
        <name>Spring Snapshots</name>
        <url>https://repo.spring.io/libs-snapshot</url>
        <snapshots>
            <enabled>true</enabled>
        </snapshots>
    </repository>
</repositories>
Also, we need to use a snapshot for plugins, because Spring Cloud Contract generates source code with the help of maven plugin:
<pluginRepositories>
    <pluginRepository>
        <id>spring-snapshots</id>
        <name>Spring Snapshots</name>
        <url>https://repo.spring.io/libs-snapshot</url>
        <snapshots>
            <enabled>true</enabled>
        </snapshots>
    </pluginRepository>
</pluginRepositories>
And now, we can add the next dependency:
<dependency>
    <groupId>org.springframework.cloud</groupId>
    <artifactId>spring-cloud-starter-contract-verifier</artifactId>
    <scope>test</scope>
</dependency>
Also, we need to add a dependency management for spring cloud 2.1.0 snapshot:
<dependencyManagement>
    <dependencies>
        <!-- If you're adding this dependency explicitly you have to
               add it *BEFORE* the Release Train BOM-->
        <dependency>
            <groupId>org.springframework.cloud</groupId>
            <artifactId>spring-cloud-contract-dependencies</artifactId>
            <version>2.1.0.BUILD-SNAPSHOT</version>
            <type>pom</type>
            <scope>import</scope>
        </dependency>

        <dependency>
            <groupId>org.springframework.cloud</groupId>
            <artifactId>spring-cloud-dependencies</artifactId>
            <version>${spring-cloud.version}</version>
            <type>pom</type>
            <scope>import</scope>
        </dependency>
    </dependencies>
</dependencyManagement>
In the plugin section, we need to configure the spring-cloud-contract-maven-plugin.
This plugin is responsible for generating a source code of contract tests:
<build>
    <plugins>
        <plugin>
            <groupId>org.springframework.cloud</groupId>
            <artifactId>spring-cloud-contract-maven-plugin</artifactId>
            <version>2.1.0.BUILD-SNAPSHOT</version>

            <extensions>true</extensions>
            <configuration>
                <baseClassForTests>com.antkorwin...MvcTest</baseClassForTests> (1)
                <testFramework>JUNIT5</testFramework> (2)
            </configuration>
        </plugin>

        ..

    </plugins>
<build>| 1 | The reference to the base class for your auto-generated tests, each of the contract tests will be inherited from this class. |
| 2 | The setting for Junit5 tests generation. |
3.2. BaseClass for contract tests
This class will be used for generating contract verification tests, as a parent class.
@ExtendWith(SpringExtension.class)  (1)
@SpringBootTest
public class MvcTest {

    @Autowired
    private WebApplicationContext context;

    @BeforeEach
    void setup() {
        RestAssuredMockMvc.webAppContextSetup(context); (2)
    }

}| 1 | of course, we use JUnit5, and ExtendWith instead of RunWith |
| 2 | RestAssured initialization with the application context. |
3.3. Describe your contracts
All that we need to make manually is a contract declaration of our API. This is a groovy based DSL, where you can describe a request to your API and expected response for it:
package contracts.tasks.write

import org.springframework.cloud.contract.spec.Contract
import org.springframework.http.HttpStatus

UUID_REGEX = "([a-fA-F0-9]{8}-[a-fA-F0-9]{4}-[a-fA-F0-9]{4}-[a-fA-F0-9]{4}-[a-fA-F0-9]{12})";

Contract.make {
    description "Create new task"
    request {
        method POST()
        url("/tasks/create") {
            queryParameters {
                parameter("title", value(consumer(regex("[a-z A-Z]+"))))
                parameter("estimate", value(consumer(regex("[0-9]+"))))
            }
        }
    }
    response {
        body(
                id: value(producer(regex("$UUID_REGEX"))),
                title: fromRequest().query("title"),
                estimate: fromRequest().query("estimate")
        )
        headers {
            contentType(applicationJson())
        }
        status HttpStatus.CREATED.value()
    }
}
You can collect groovy files with contracts in packages and put it in the resources, as you can see here:
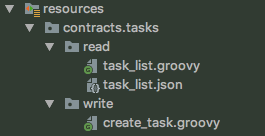
A little later we will consider generated tests from this contracts.
In my opinion, the using of groovy is a more intuitive and maintained way of describing a contract than using something like YAML. By the way, Spring Cloud Contract supports both of these variants (groovy and YAML).
3.4. Generate the contract tests and install stubs
So, if you added all the needed dependencies and wrote a contract, then we can build the project:
$ mvn clean install
...
[INFO] --- maven-install-plugin:2.5.2:install (default-install) @ task-service ---
[INFO] Installing task-service-0.0.1-SNAPSHOT.jar to ~\.m2\...
[INFO] Installing pom.xml to ~\.m2\...
[INFO] Installing task-service-0.0.1-SNAPSHOT-stubs.jar to ~\.m2\...
[INFO] ------------------------------------------------------------------------
[INFO] BUILD SUCCESS
[INFO] ------------------------------------------------------------------------
[INFO] Total time: 01:47 min
[INFO] Finished at: 2018-09-18T11:07:33+10:00
[INFO] Final Memory: 82M/280M
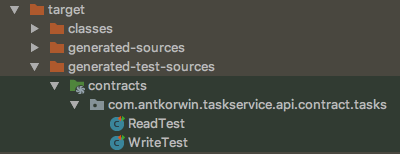
[INFO] ------------------------------------------------------------------------After a successful build of your project,
you get a generated test for the groovy contract in the /target/generated-test-sources/contracts folder,
as you can see on the next image:
Let’s look at these tests:
public class WriteTest extends MvcTest {  (1)

  @Test
  public void validate_create_task() throws Exception {  (2)
    // given:
    MockMvcRequestSpecification request = given();
    // when:
    ResponseOptions response = given().spec(request)  (3)
                                      .queryParam("title","G ")
                                      .queryParam("estimate","42")
                                      .post("/tasks/create");
		// then:
    assertThat(response.statusCode()).isEqualTo(201);
    assertThat(response.header("Content-Type")).matches("application/json.*");
    // and:
    DocumentContext parsedJson = JsonPath.parse(response.getBody().asString());  (4)
    assertThatJson(parsedJson).field("['title']").isEqualTo("G ");
    assertThatJson(parsedJson).field("['estimate']").isEqualTo("42");
    assertThatJson(parsedJson).field("['id']")
      .matches("([a-fA-F0-9]{8}-[a-fA-F0-9]{4}-[a-fA-F0-9]{4}-[a-fA-F0-9]{4}-[a-fA-F0-9]{12})");
  }

}| 1 | the generated test extends from our base test class (MvcTest) |
| 2 | the name of the test case generated from the name of the file with a contract |
| 3 | this request generated from the contract |
| 4 | the response will be verified by the contract. |
When you put some breaking changes in the contract, these tests help to find the place which you need to change.
Sometimes the code of these tests looks like boilerplate, but it’s not important, because these tests are needed only to ensure the correctness of the contract.
And if you run it, you can check your contract.
When you run mvn clean install these tests will run automatically,
after generation stage.
Besides that, after generates and runs all tests maven will install binary artifacts in the local folder .m2
Among these artifacts there is one new - an artifact with the stub of contracts: prediction-service-0.0.1-SNAPSHOT-stubs.jar.
If you need the only generation of test sources without run all tests and install artifacts, you can run mvn generate-test-sources.
Sometimes for debugging you need to install contracts without running tests, in this case, you can do it by mvn clean install -DskipTests.
3.5. Different base classes for different test cases
Often we have test cases with a different initialization logic. For example, when you test a creating of something, you don’t need to prepare in the database the already created records. But if you test a reading of something from a database, then you need to be sure that read data sets exist in the database.
You can set a package with the base classes for tests generate, instead of setting a one base class for all tests.
<plugin>
    <groupId>org.springframework.cloud</groupId>
    <artifactId>spring-cloud-contract-maven-plugin</artifactId>
    <version>2.1.0.BUILD-SNAPSHOT</version>
    <extensions>true</extensions>
    <configuration>
        <packageWithBaseClasses>com.antkorwin.taskservice.api.contract</packageWithBaseClasses> (1)
        <testFramework>JUNIT5</testFramework>
    </configuration>
</plugin>| 1 | package with the base classes |
And now, you need to keep your contracts directory in the next kind:

The names of your base classes depend on the structure of the contracts package, you need to reflect the names of directories in the name of the base class.
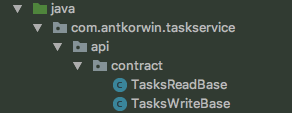
And you will get the next generated tests structure:
Also when you write several contracts in one package, then you get a test class with multiple test cases. All of these items were named like packages and files in the resource directory:
So, we got a next tests after run generate-test-sources:
public class ReadTest extends TasksReadBase {  (1)

  @Test
  public void validate_task_list() throws Exception {
    ...
  }
}

public class WriteTest extends TasksWriteBase {  (2)

  @Test
  public void validate_create_task() throws Exception {
    ...
  }

  @Test
  public void validate_create_subtask() throws Exception {
    ...
  }
}| 1 | extends from the first base class (for tests of reading) |
| 2 | extends from the second base class (for tests of writing) |
4. Consumer configuration
To be sure of the contract on the consumer side, we need to write tests on the communication layer between services (which used RestTemplate or Feign). In this tests, we will use a mock of the server which is started from the downloaded stub of contracts.
4.1. Dependency
The configuration of dependencies looks simpler on the consumer side than of the provider. All what we need is the stub runner dependency:
<dependency>
    <groupId>org.springframework.cloud</groupId>
    <artifactId>spring-cloud-starter-contract-stub-runner</artifactId>
    <scope>test</scope>
</dependency>
4.2. Test with a stub of contracts
In order to use a stub in tests, we need to use the @AutoConfigureStubRunner annotation:
@ExtendWith(SpringExtension.class)
@SpringBootTest(webEnvironment = SpringBootTest.WebEnvironment.NONE)
@AutoConfigureStubRunner(ids = {"com.antkorwin:task-service:+:stubs:8585"},  (1)
                         stubsMode = StubRunnerProperties.StubsMode.LOCAL)   (2)
class TaskServiceFeignIT {

    @Autowired
    private TaskServiceFeign taskServiceFeign;

    @Test
    void getAllTasks() {
        List<Task> tasks = taskServiceFeign.getAllTask();
        assertThat(tasks).isNotNull()
                         .extracting(Task::getEstimate)
                         .contains(20, 5, 100);
    }
}| 1 | binary artifact with the stub of contracts |
| 2 | LOCAL/REMOTE mode |
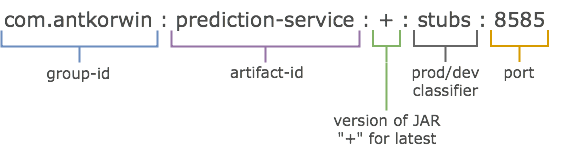
As you can see the ids: com.antkorwin:prediction-service:+:stubs:8585 is contain of :
If you select a LOCAL mode, the stub runner will find binary artifact with contracts in your local maven repository (~/.m2/).
Else if you select a REMOTE mode, you will need to set up the repositoryRoot where the stub runner will find a jar with contracts
(we will consider the REMOTE configuration in more details a little later).
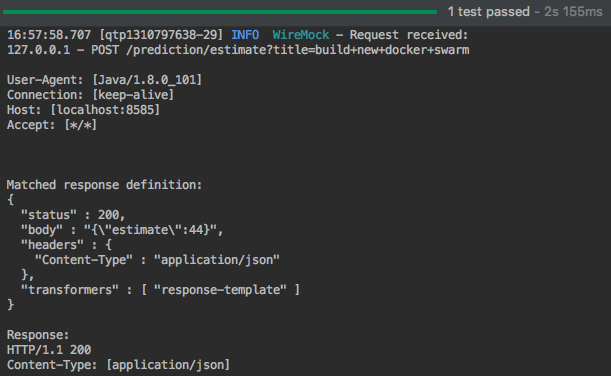
Let’s run this test with a local configuration:
5. How to use the Stub Runner (manual)
You can download stub runner server here: spring-cloud-contract-stub-runner-boot-2.0.1.RELEASE.jar. This is a simple Spring Boot application(made by Spring Cloud team) that starts a web server with API which described in the stub of contracts.
let’s run the next command to start the stub runner with contracts of the task-service on the 7000’s port:
$ java -jar ../spring-cloud-contract-stub-runner-boot-2.0.1.RELEASE.jar --stubrunner.stubs-mode="local" --stubrunner.ids=com.a ntkorwin:task-service:+:stubs:7000then you can send a request to stub server:
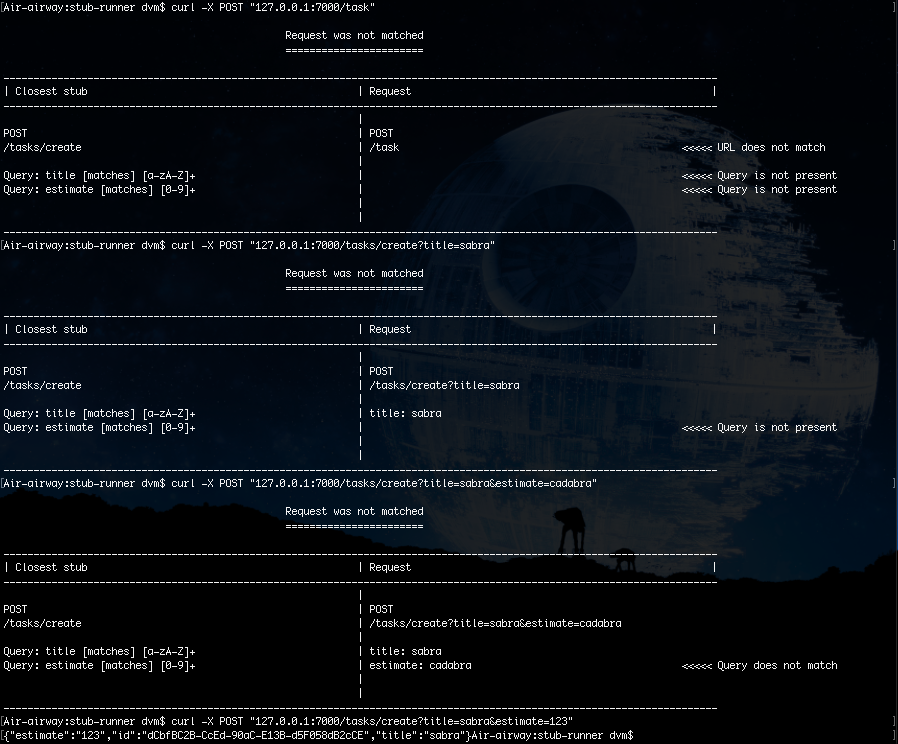
$ curl -X POST '127.0.0.1:7000/tasks/create?title=Foo&estimate=123'If you send a wrong request or make some typos in the URL or request parameters, the stub runner will find a more closest variant of API which existed in the loaded stub and will show it for you:
6. How to use Spring Cloud Contracts with a remote repository and configure CI system.
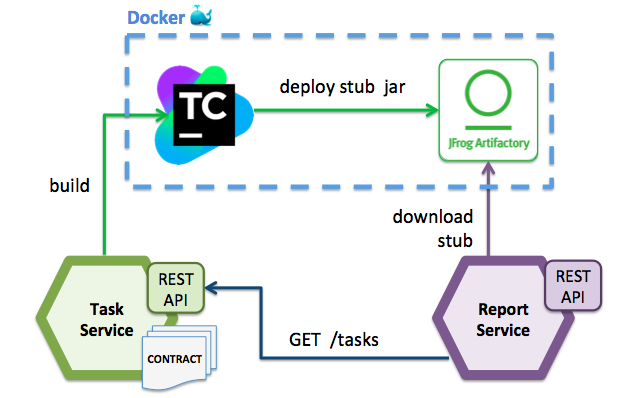
Now, we can make a contract and we can build and install it locally, the next step is a deploy this contract in the remote repository and sharing stubs between the different team of developers. We will use a JFrog Artifactory as a binary repository and TeamCity as a CI server.
6.1. Run TeamCity and Artifactory with docker-compose
All that we need is to run the next docker compose file:
version: '3'
services:
  teamcity-server-instance:
    image: jetbrains/teamcity-server
    ports:
     - "127.0.0.1:8111:8111"
    restart: always
    volumes:
      - ./test/teamcity/data:/data/teamcity_server/datadir
      - ./test/teamcity/logs:/opt/teamcity/logs
    networks:
      - teamcity-network

  teamcity-agent-instance:
    image: jetbrains/teamcity-agent
    restart: always
    volumes:
      - ./test/teamcity/agent-conf:/data/teamcity_agent/conf
    environment:
      - SERVER_URL=teamcity-server-instance:8111
    networks:
      - teamcity-network

  artifactory-instance:
    image: docker.bintray.io/jfrog/artifactory-oss:latest
    ports:
      - "127.0.0.1:8081:8081"
    restart: always
    networks:
      - teamcity-network

networks:
  teamcity-network:
Here we start a TeamCity Server and TeamCity Agent on the same network, after this, we will start Artifactory.
$ docker-compose up

Starting tc_artifactory-instance_1     ... done
Starting tc_teamcity-agent-instance_1  ... done
Starting tc_teamcity-server-instance_1 ... done

...
6.2. TeamCity & Artifactory configuration
When the all services successfully started, you need to configure TeamCity and create maven repository in the Artifactory.
As you can see on the next video, you need:
-
install artifactory teamcity plugin
-
setup connection from TeamCity to Artifactory
-
install Maven repository in the Artifactory
-
configure build step of the project in TeamCity, to deploy artifacts in the configured Artifactory instance

6.3. Use the remote repository in the consumer tests
Now we need to set up a remote repository URL for stub runner:
@EnableIntegrationTests
@AutoConfigureStubRunner(ids = {"com.antkorwin:task-service:+:stubs"},
                         stubsMode = StubRunnerProperties.StubsMode.REMOTE,
                         snapshotCheckSkip = true,
                         repositoryRoot = "http://192.168.0.8:8081/artifactory/libs-snapshot-local") (1)
class TaskServiceFeignIT {

    @Autowired
    private TaskServiceFeign taskServiceFeign;

    @Test
    void getAllTasks() {
        List<Task> tasks = taskServiceFeign.getAllTask();
        assertThat(tasks).isNotNull()
                         .extracting(Task::getEstimate)
                         .contains(20, 17, 100);
    }
}| 1 | Use an address of artifactory instance |
When you commit something in the git repository, TeamCity fetch it, build and deploy artifacts in the Artifactory, you can see all this sequence on the next demo: